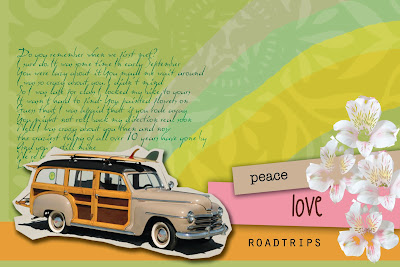
lets make this!

Step one:
Open photoshop - very easy.
Step two:
Create a blank photoshop document postcard size (6 inches by 4 inches), or you can choose whatever size you like.
Step three:
Find a vintage style picture that you really like. I found this old car on Getty Images. Some ideas for cool pictures could be old piano's, soap adverts, gramophones, record players, vintage cars, candy stores, barber shops or "desperate housewives".
Here is my picture: (you will find it on Getty if you search for "vintage car station wagon")
Step three:
Take your picture and open it in photoshop. Cut out the image from the background. You can do this in a number of ways: either the magic wand tool or the pen selection tool. I want a rough look for this collage so I used the pen selection tool to roughly cut out the image. Once you have roughly cut out the image - right click to make a selection and then right click the image again to 'layer via copy'.
Step four:
Use the dropper tool to select a colour in your picture (I have chosen the green in the car window) and create a new fill layer using the colour by clicking Layer > New Fill Layer.
Step Five:
Draw a rough rainbow or any other easy shape or pattern using the paintbrush tool. Your drawing could be clouds, stars, candies, stripes etc- use your imagination! You can also set the blend mode of your paint drawing to suit your picture. I chose a soft light blending mode which you can find in the Layers Palette.
Step Six:
Get some handwritten ramblings or find your favourite lyrics online and add them to the background of your picture. You can set the blending mode to suit the colour scheme of your picture like this:
Step Seven:
Find some extra pictures - I chose white flowers, but you could go with old typewriters, soda cans, stray cats, outlines of birds or trees. "Cut out" the pictures you have chosen using either the pen tool, lasso tool or magic wand. Place the pictures on your card and blend them using the options on the Layer Palette. It is also useful to play with the opacity of the layer :)
Step Eight:
To add some extra texture to your rough-look collage you can take some fabric pattern images (search for images online) and place it behind your colour background. You can adjust the blending layers to find a mode that works with the overall design. Add some extra text in bright text boxes and VOILA!
Get creative, challenge yourself and hone your photoshop skills. Try this tutorial or find one that inspires you here.


