
I love vintage style lomography pictures and I've been trying to create a lomography/vignetted style black and white image with my digital photographs. Here is how it went down:
Step 1. Choose a digital image you like. (wow that was easy.) I feel that simple images are better - but i'm not an expert. (also for my next attempt at this I would use an image that has something more close up/in the foreground) Here is mine (taken at an abandoned temple in Sri Lanka)

Step 2: Convert the image to black and white by selecting IMAGE > ADJUSTMENTS > DESATURATE. easy, like this:

Step 3: FILTER > DISTORT > DIFFUSE GLOW. This give the image a soft feel that is synonymous with vintage cameras.
Adjust your levels of graininess, glow and clear. This will depend on the resolution of your image. Larger values for larger images and smaller values for smaller images. (simple) The graininess helps to give the image the same type of feel that you would get from an ISO400 speed film and it helps to make the image feel more like film. The amount of graininess (as with everything is up to you)

Step 4: To create the vignette style you need to make an oval shape using the elliptical marquee tool like this (this is che's version. it doesn't look exactly like this in photoshop. but its close enough)

Step 5: You need to select the inverse of this SELECT > INVERSE and then you need to SELECT > FEATHER. You can set the feather radius to about 200 pixels. But this also depends on the image size like before. (I was using a 440 pixel wide image so my radius was only set to about 100) This step will help to give a gradual fade out and make the vignetting more realistic.
With the inverse still selected got to IMAGE > ADJUSTMENT > CURVES and drag the curve down by clicking on the line in the centre of the graph thingy. This will make the edges of the picture darker. Play around with it - until you feel it looks most realistic. (or good for whatever effect you're going for.)

Step 6: Next we need to give the image a blurry feel to mimic old school cameras you can do this buy clicking FILTER > BLUR > GAUSSIAN BLUR and set the blur radius to between 8 - 15 pixels. If you want it more blurry drag it to the right and vice versa: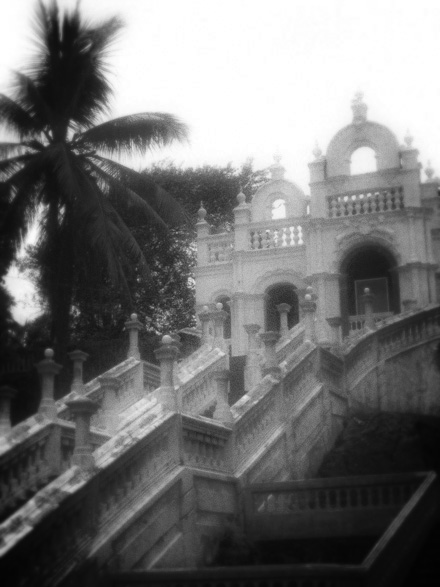
Step 7: Adding the blur obviously removes some of the graininess so in order to get that grainy texture back remove the oval selection and select FILTER > NOISE > ADD NOISE about 3% or 4%.
Step 8: If you would like to add some tone to your image you can select IMAGE > ADJUSTMENTS > HUE/SATURATION. If you want to give it a blue-tone like mine make sure cyanotype is selected in the preset and adjust your hue to about 204 and your saturation to about 7. You can also adjust the lightness to make it more realistic for your photograph. et voila!

So there you have it. But that was actually quite the mission.
Happy Sunday *
1 comment :
Magnificent beat ! I would like to apprentice at the same time as you
amend your site, how could i subscribe for a weblog web site?
The account helped me a acceptable deal. I were a little bit acquainted of this your broadcast provided bright transparent concept
my weblog :: diet plans that work for women
Post a Comment