Showing posts with label paper. Show all posts

Wednesday, July 24, 2013

Books. And Papery things.

 photo book1_zps375aefd9.jpg

When I moved over from South Africa to London a few months ago - i had some serious decisions to make. Like most importantly, what to pack in my suitcase.

I wish I was lying to you when I say that I literally did not pack clothes into my suitcase. Yes, I will be fair: there was one pair of jeans and some underwear - but that was pretty much it.

The rest (and by "rest" I mean "all") of the suitcase was filled with books. paper. stationery. stamps. washi tape. envelopes. random memorabilia. and other such worthless priceless treasures. I even had a funny little incident at the airport when a bunch of my "treasures" fell onto the passenger behind me. When I arrived in London and opened my suitcase in front of the husband - he began laughing at me for packing my entire suitcase with papery things.

I quickly reminded that lovely-husband-of-mine that scrapbook paper and craft stamps as a "get-out-of-jail-free" present is far more pocket-friendly than the Jimmy Choo counterpart. Husband went quiet very quickly and helped me unpack my paper-scraps.

  photo book13_zps8563646c.jpg
In fact, I have so much "papery things" and so little of the "clothing things" that I have resorted to wearing my Tony-the-Tiger t-shirt every day. Which is no wonder I always get asked for ID.

Anyway it was a really hard choice deciding which books to bring over and which to say a short farewell to. I absolutely love all my creative/blogging books - even though there are amazing blogging forums and blogs dedicated to blogging tutorials etc (PuglyPixel being one of my faves) to read - there is something different about sitting down with an actual book -

 photo book5_zps053d845d.jpg  photo book3_zpsf5255dd6.jpg

I started reading Craft Inc (also by Joy Cho) and finished it in approximately 2.7 seconds. Then (very lovely husband) went and bought me Blog Inc which I devoured in about 5 seconds (because of course I had to stop to check out links to different sites and bloggers). I loved these books so much and I remember when I was reading the Craft inc book - that in my head I kept silently chanting "please don't finish. please don't finish. please don't finish." Will do a proper review of these books soon.

 photo book2_zps327c4910.jpg

This book above has actually a very funny story attached to it - but that story deserves it's own cartoon - so I will scribble it up when I get a gap. This is quite a technical/practical focus on blogging and I love that it references so many awesome blogs - have discovered quite a new host of blogs through this book - but more on those to come.

 photo book10_zpsbb30a4bb.jpg  photo book9_zpsb0974fae.jpg

Two other creative/inspirational books that made the cut: The Creative License and 1000 artist journal pages. Filled with such good ideas and inspiration - love them both!

 photo book4_zps5ffd48c4.jpg  photo book7_zps9b06ca2a.jpg

And of course, I had to bring along all my washi tape because,
washi tape.

duh.

 photo book6_zps61dbf938.jpg  photo book12_zps724b1a5d.jpg  photo book11_zps6c16e675.jpg  photo book8_zps55d24ab0.jpg

and all the paper.

 photo book16_zps8cbe6dc7.jpg
I've just gotten round to unpacking these little treasures - they had been sitting in my suitcase waiting for a home. They look so lovely on the shelf together, but alas whenever I open my cupboard in the morning to find something to wear (Tony-the-Tiger) I want to weep for all my lovely clothes sitting in South Africa (which have probably already been claimed by my mother). But whatever, paper makes me happy.

So, 


If you need me - 
I'll just be hanging out in the lounge

in my dress made from washi-tape.


* * * * *

PS: Look out for some reviews and tips from the blogging books I've read - New series coming soon!
Thursday, July 4, 2013

{DIY} Paper Flowers

 photo ourwedding_zps0d13643a.jpg  photo paperflower17_zps2f6b4bb4.jpg
Even before I was engaged I had joked with my friends that I would always have paper flowers at my wedding. I'm way more of a "papery" person than a "florally" person - so I guess it just seemed fitting. When we decided on our general "Moroccan-esque" wedding vibe  - I was sold on the idea of making my own flowers so that I could bring in lots of golds, coppers and bronzes. Because I don't know where you can get real flowers that are in those kinds of rich colours.

My paper-flower making adventures started with a lot of guesswork but I will tell you some essential things you will need if you attempt them -
  • A Glue gun. It is essential. Nothing else will really stick your flowers well enough.
  • Paper - I used pages from an old book I bought at a market
  • Florist Tape (and washi tape)
  • A wooden dowel rod (or a stem-like "something" that you can attach your petals to)
 photo paperflower11_zpscfa31d1f.jpg
 photo paperflower9_zps8f5e7c3b.jpg photo paperflower12_zps5fe68d42.jpg
(Pictured here is not actually florist tape - I used washi tape to cover the florist tape underneath. Florist tape is good because it is really sticky and stretches well over different surfaces. It's also really inexpensive and can be purchased from any local garden/florist shop)

 photo paperflower4_zpscf72b199.jpg
When you are making your flowers you will also need something to stick your flowers onto - like a thin wooden dowel rod. My mom happened to be throwing away a bunch of very old plastic flowers so I rescued took them and stripped the existing petals to be able to use the stems - which conveniently were already green and had leaves which could also be salvaged.

I attempted a few flowers using a bit of guesswork and the first one came out pretty well - but if I wanted them to look "kind of" similar I needed a proper petal template so I googled a bit and found this one from the Martha Stewart website.

Martha has a whole long other process about boiling your paper and making mulch and then letting the mulch set and then blending it to a pulp and then spreading your pulp onto a cookie tray...and then... Whatever. She's just being dramatic. You don't need all that.

I did however use her petal templates as a rough guide for cutting out my own petals - (And to be honest, I didn't even use her templates - I just got an idea of the rough shape of the petals and then drew my own templates. You really don't need Martha. Just sayin'.
  photo paperflower14_zpsc3b6f8db.jpg  photo paperflower2_zps568d697d.jpg
The basic thing is that the petals get wider as you get further out.

 photo paperflower7_zpsd604f343.jpg
 photo paperflower6_zps53c871f3.jpg

Of course I also found it hilarious to scan each page of the novel I was hacking up and highlight any phrases pertaining to marriage. lol

 photo paperflower5_zpse2e2416e.jpg  photo paperflower8_zps43d4a004.jpg  photo paperflower3_zpsd08a6b2b.jpg photo paperflower1_zpscfb945af.jpg

Yep - all those hilarious little marriage quips - right there in our wedding flowers.


I painted the petals in different shades of bronzes, coppers and golds. I wanted there to be a lot of texture in the flowers so I let a lot of the words show through in most of the petals.

 photo paperflower13_zps72b9b5b4.jpg

I wanted to get the pages to curl up slightly so that they had a more natural look rather than being very flat and "paper-like". I tried a few different techniques to get this right - including the very scientific "wet the pages, put then in a spoon rest with a lemon on top and hope they dry in that shape" -

 photo paperflower10_zps3d9b815b.jpg
Nope.

That didn't work.
But it was good in theory.

I found what worked the best (and also easiest) was to take each page and curl it around a pencil/chopstick/back of a paintbrush in the direction you want it to curl - you can curl them as much or as little as you want depending if you want your flowers more open or more closed -

 photo paperflower15_zps9251dd12.jpg
And from then you just start sticking the petals onto your stem starting with the smallest petals first and working your way outwards using the glue gun at the base of the petal. The good thing about using a glue gun is that the glue dries pretty quickly. Once you are finished sticking all the petals you can wrap the stem with florist tape or washi tape to hide the glue.

Was very pleased with how they turned out - all my flower girls and junior bridesmaids each had a big bronze/coppery paper flower to hold as they walked down the aisle. (The bridesmaids and I all carried "real flowers" because like... yeah, it's a wedding and I couldn't escape it)

 photo paperflower18_zps956ca655.jpg
 photo paperflower20_zps200e2f19.jpg
 photo paperflower19_zpse899c35e.jpg photo paperflower21_zps850d0336.jpg
My mom, my little cousin and my paper flowers - all things so beautiful in this picture!

 photo paperflower23_zpsf3a2ef97.jpg  photo paperflower22_zps05e88bf5.jpg  photo paperflower24_zps999ee268.jpg    photo paperflower16_zps25fefe1e.jpg

Friday, July 8, 2011

i TOLD you so

So, remember yesterday's post - the one about the HOARDING? Where i NEED everything. Like all the scarves and ALL the bags and the mirrors and ESPECIALLY the three pieces of paper that i rescued? Well I'd just like to say, I REALLY did need those three pieces of paper -

To make my life more organised and my apartment more beautiful:

Photobucket
Photobucket
Photobucket
Photobucket
Photobucket
Stick the pages onto your wall and then you will be SO organised and you won't forget all the things you have to do with your life.

Moral of the story?
Never throw anything away. You NEED IT.
Don't ever give anything away.
EVER.

Tuesday, March 15, 2011

Rock, Scissors, PAPER

Our lovely friend Laura has gone back to America. 
SOB.
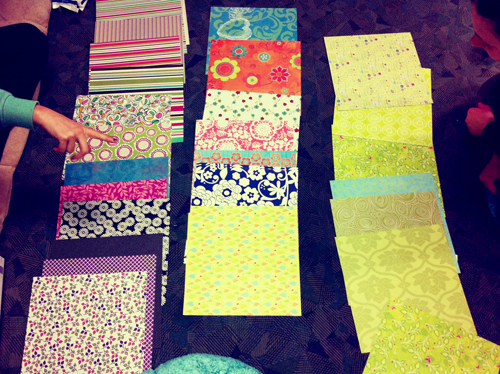
Laura is a paper-hoarder connoisseur and she decided to give away some of her lovely American scrap-book papers before she left to go home. Dom, kristi and che gathered for the ceremony.
some of the spread. (actually it took a long time to decide how to lay them out on the floor. Should we put the similar patterns together?! or the same shades?! or the stripes together?! But they are so different!! But these ones have like textures!! what shall we do about those?!!)
it was stressful from the start.

(no. they didn't like that idea)
Laura didn't know the right answer. Then Kristi had an idea:
In Korea. EVERYTHING is solved with Rock, Scissor Paper.
(except here is it called Kai, Bai, Boh)

two fighting kids in the classroom? 
KAI BAI BOH!!

Who gets the last piece of kimchi?
KAI BAI BOH!!

International public relations with North Korea?
KAI BAI BOH!!

Ok so we were Kai Bai- Bohing for the paper.
Rock Scissor Paper for the Paper.
(smart)

yes. it's three way. only in korea.

ROCK* SCISSOR* PAPER!!!


K.O. Kristi.

so, kristi got kicked out. and now:

CHE VS DOM

(it was all kristi who put that idea of paper into our heads)
Anyway, we played again until Che won.
Then we chose our papers.

Then Laura upped the game and brought out the DOUBLE SIDED PAPERS.
(LIKE A DOUBLE FREAKING RAINBOW. BUT MORE PAPERY)

For the choosing of these papers we decided to up the Kai-Bai Bohing.
For really tricksy decisions in Korea (ie international relations) they have a double Kai Bai Boh.
Each player puts in both hands at the same time and then you yell 
"HANA BBEKKI!"
which means "take one out"

So, the players have a spilt second to check out what is already on the table and then take out a hand to try increase their chances of winning.

It goes without saying that in this version of the game, it is most beneficial to have two DIFFERENT hand symbols.

CHE = FAIL.

it was the pressure.
So. MUCH. PRESSURE.
anyway i got to pick last and on the last round... there was one paper short.
sob.

ha. 
it was a lot of fun and we all got really lovely papers.
(and since my style is more weird unique than the others, they didn't choose the papers that I wanted anyway :) We all win!)


challenge a stranger to KAI BAI BOH
(go with paper)